📋 Resumo
Detalhar um carro vai muito além de uma simples lavagem. Neste guia passo a passo, você aprenderá todos os segredos dos especialistas em detalhamento para deixar seu veículo com um acabamento de showroom. Desde a limpeza das rodas e pneus até a restauração da pintura, polimento e cuidados com o interior, vamos cobrir todas as etapas essenciais para um carro com aparência de novo. Siga nossas dicas e produtos recomendados para se tornar um verdadeiro mestre do detalhamento!
Com instruções detalhadas e lista de produtos, este guia te levará a dominar todas as técnicas de detalhamento automotivo em 2023. Aprenda a deixar seu carro impecável em casa, da lataria à cabine, e mantenha-o sempre com um visual de showroom.
📋 Resumo
Detalhar um carro vai muito além de uma simples lavagem rápida. Neste guia passo a passo, você aprenderá todos os segredos dos especialistas em detalhamento automotivo para deixar seu veículo com um acabamento de showroom. Desde a limpeza das rodas e pneus até a restauração da pintura, polimento e cuidados com o interior, cobrimos todas as etapas essenciais para um carro com aparência de novo. Siga nossas dicas e produtos recomendados para se tornar um verdadeiro mestre do detalhamento automotivo.
Giving your car a quick clean is very different to a thorough detail. We’ll talk you through each step of car detailing so you can be a pro too.
If you want to get your car looking it’s absolute best, then you’ve come to the right place. We’re sure you know what detailing is all about, but if you don’t, have a look at our article to what is car detailing.
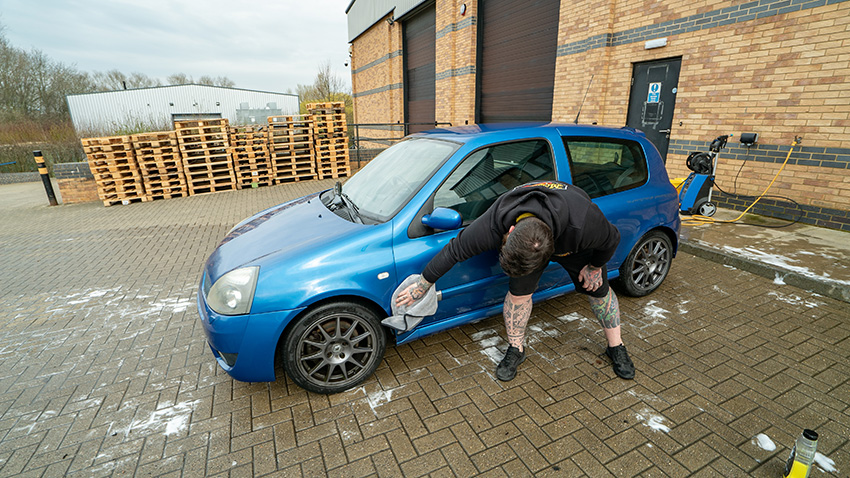
Detailing a car is a skill. Doing it right, and in the correct order not only means that your car is shining all year round, but it’ll also combat things like rust build up and paintwork damage. Besides, who wants to get into your car as a passenger if you’ve got dirty handles and chip packets in the footwell?
You don’t have to used a detailing service to get professional results either. Following these steps below, you’ll learn how to detail a car correctly at home.
Detailing Wheels and Tires
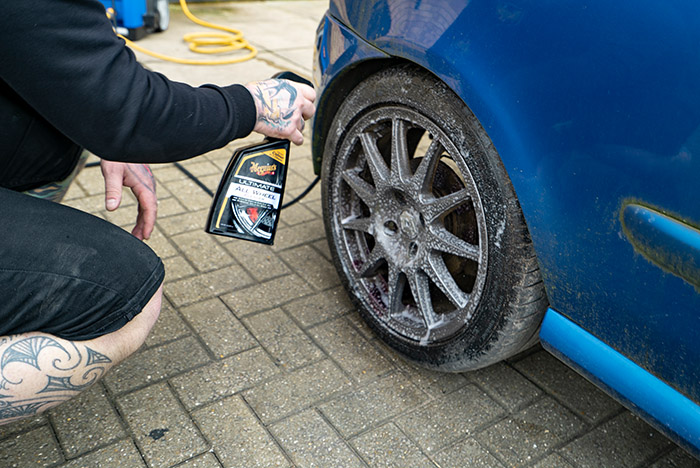
How long: 5-20 mins.
Products: Wheel cleaner.
Detailing gear: Bucket, grit guard, wheel brushes, tire brush.
Wheels and tires are the first things you should tackle when car detailing. This is because they tend to be the dirtiest areas. You don’t want to wash them after you’ve detailed the rest of your car. If you’re in a rush and your wheels aren’t too bad, you can get away with just spraying the wheel cleaner on and letting it dwell before rinsing it off, otherwise, you’ll want to use some wheel brushes to give the surfaces a thorough clean. A tire brush will help get your rubber clean and make sure you use a separate bucket with water to rinse off your brushes as you go.
Check out our step-by-step guide on how to clean your alloy wheels so you can perfect the process. You can also check out the top 10 wheel cleaners on the market right now.
Pre-washing a Car
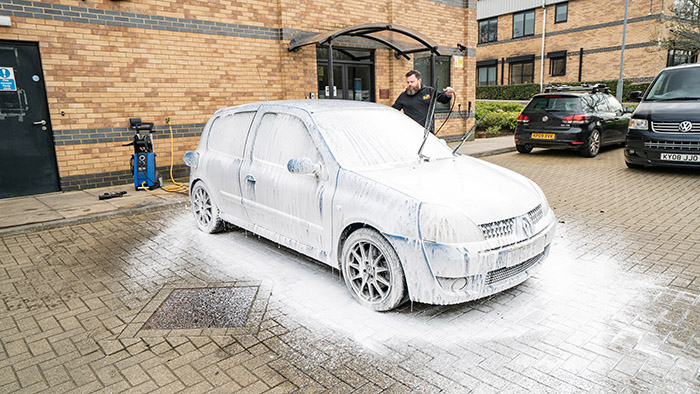
How long: 10-30 mins.
Products: Pre-wash spray, snow foam.
Detailing gear: Soft detailing brushes, foam cannon.
When we think about what is car detailing, we imediately think about washing the car. But prepping the surface before using shampoo is essential for the ultimate shine. Done correctly, the pre-wash stage of car detailing will remove enough dirt to make the actual washing stage a breeze. A good pre-wash spray, like an MPC or citrus product, should be applied to the dirtiest areas of the car, like the lower portions of the panels, and allowed to dwell before you apply the snow foam. While this dwells, use your soft detailing brush on the window rubbers and badges before rinsing everything off.
If your car isn’t too dirty, and you’re short on time, go straight in with the snow foam. You’ll still get good results.
Check out our step-by-step guide on how to pre-wash your car so you can perfect the process. Looking for the best products? Check out our guide to the best snow foam in 2023.
Washing a Car
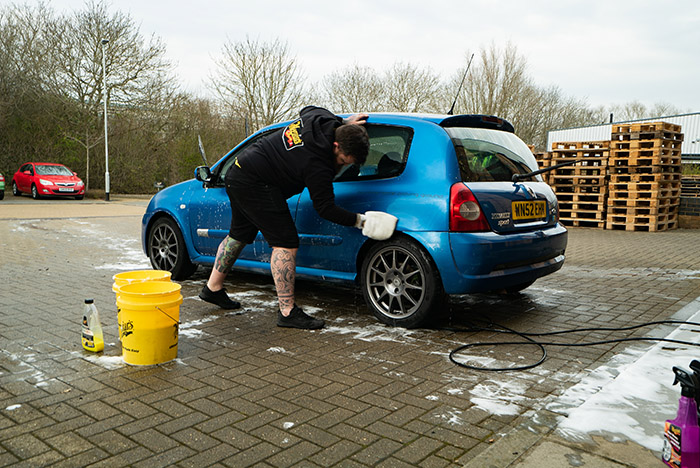
How long: 20-40 mins.
Products: Shampoo.
Detailing gear: Wash mitts, two buckets, grit guards.
The detailing essentials here are your two buckets, both equipped with grit guards, and one or more microfiber wash mitts. Having two buckets helps to keep your wash water cleaner. The grit guards help to keep heavier particles at the bottom of the buckets. This prevents them from getting onto your wash mitt and potentially causing damage. Wash mitts, ideally microfiber ones, effectively lift dirt away and trap it, so it won’t scratch your paint while you wash.
Always wash from the top (the cleanest area on the car) to the bottom (the dirtiest); you can even use a dedicated wash mitt on the lower areas and another for your exhaust tips.
Check out our step-by-step guide on how to wash your car so you can perfect the process. Looking for the best products? Check out our guide to the best car shampoos in 2023.
Drying a Car
How long: 10-30 mins.
Detailing gear: Drying towels.
The key to drying your car thoroughly, is using the biggest, most absorbent drying towel you can find. This will make your job so much easier. One of these will suck up the water far more effectively than other types of towels and cloths. This will leave you with fewer streaks and water spots. Again, it’s always best to dry from the top down. It’s also a good idea to have a spare towel to hand in case your first starts getting waterlogged and stops drying as well as it should.
Check out our step-by-step guide on how to dry your car so you can perfect the process. Looking for the best products? Check out our guide to the best car drying towel in 2023.
Tire Shine

How long: 5-10 mins.
Products: Tire dressing.
Detailing gear: Applicator, cloths.
Applying tire shine doesn’t just leave your tires looking lovely and black. It also helps to keep your sidewalls looking cleaner for longer and protects the rubber from UV damage. It doesn’t take long to do and is always worthwhile. The quickest and simplest products to use are aerosols that you simply spray on and leave. Gels need to be applied directly to the tire by hand. If you’re not a fan of high-shine finishes, don’t worry, most tire dressing products can be applied in a way that will leave you with either a glossy or matt finish.
Check out our step-by-step guide on how to apply tire shine so you can perfect the process. Looking for the best products? Check out our guide to the best tire dressings in 2023.
Detailing a Car’s Engine Bay
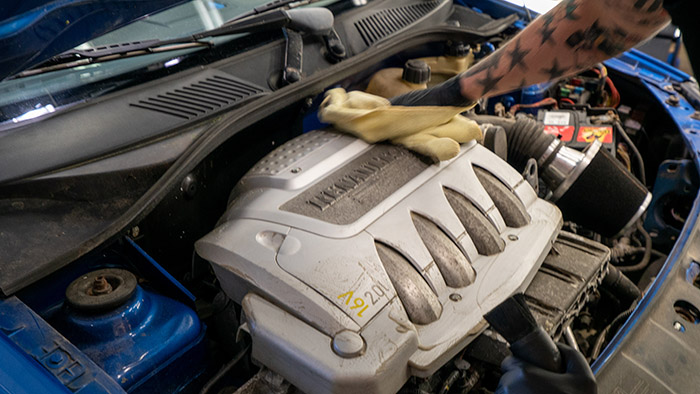
How long: 20 mins+.
Products: Multi-purpose cleaner.
Detailing gear: Detailing brushes, microfiber cloths.
The engine bay is one area of any car that very few people think about cleaning. However, it can get pretty mucky under the bonnet, so it’s worth keeping on top of alongside your car detail. You can go pretty full-on, opting for steam cleaning or even snow-foaming your engine. But, the simplest and safest way to keep your bay clean is with some MPC and some detailing brushes. This will allow you to shift grease and grime, instantly getting your engine bay looking that much cleaner and shinier with minimum effort.
Check out our step-by-step guide on how to clean your engine bay so you can perfect the process.
Using a Clay Bar On a Car
How long: 2 hours+.
Products: Clay bar, quick detailer.
Detailing gear: Microfiber cloths.
What is car detailing without a little elbow grease? Claying your car isn’t something you’ll be doing often. It should, ideally, always be followed up with paint correction, as the process can mar the surface of your car’s bodywork. Clay is incredibly sticky and will lift dirt and contaminants that have adhered to your paintwork, which washing alone won’t remove. You’ll be amazed at just how much dirt claying will remove, especially on a car that’s never been clayed before, and it will leave the surface of your paint incredibly smooth to the touch.
Take your time, don’t rush, and do each section carefully and thoroughly. If you are in a hurry, you can use clay mitts and cloths, many of which only need to be used with shampoo rather than quick detailer, and these will deliver good results but can be a little aggressive, meaning clay bars are still the best choice.
Check out our step-by-step guide on how to use a clay bar on your car so you can perfect the process.
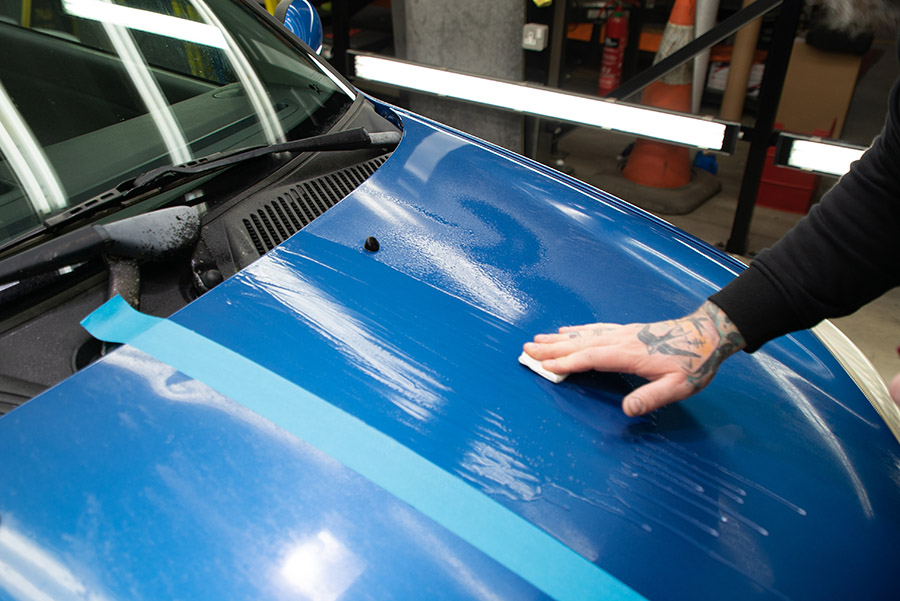
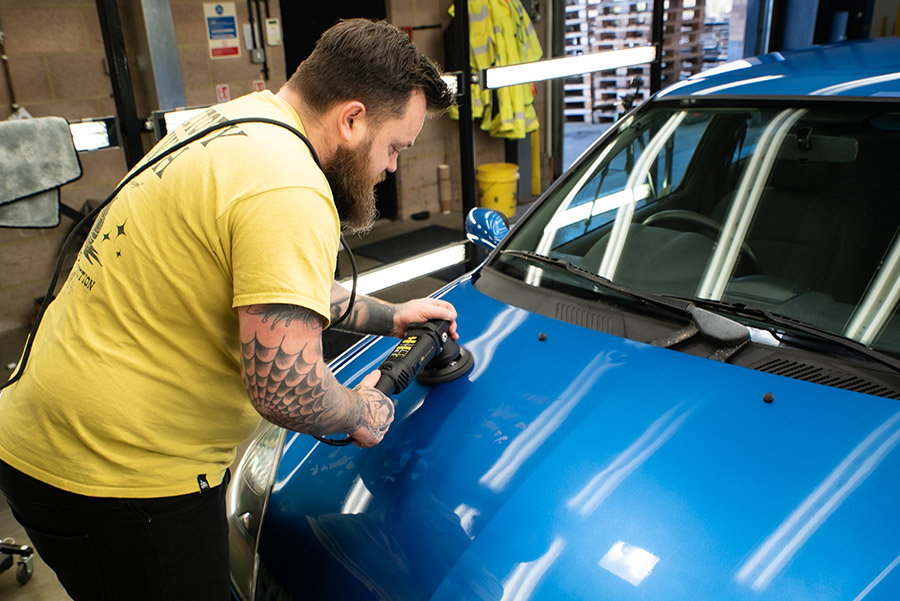
Paint Correction Car Detailing
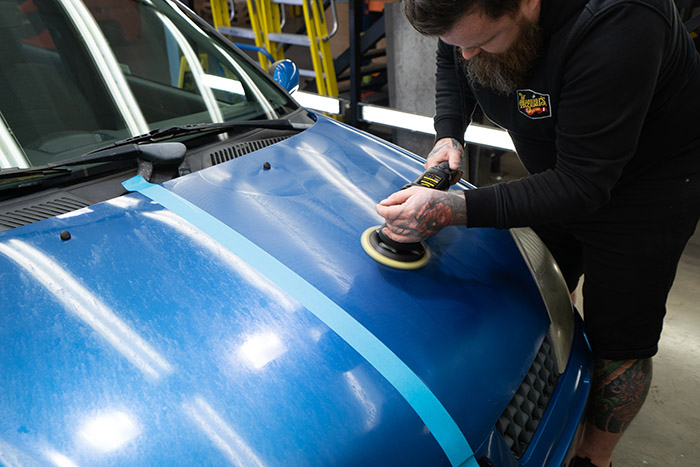
How long: 3 hours+.
Products: Correction compound, polish.
Detailing gear: Dual-action polisher, cutting pads/discs, polishing pads/discs, paint-depth gauge.
Paint correction might seem intimidating, but done correctly and with care, you can get exceptional results. It’s not a step you should be skipping if you want the ultimate car detail. This process involves using a cutting compound to remove the microscopic layers of lacquer that have swirls and imperfections in. This leaves your paint looking incredibly shiny, with stunning depth and crystal-clear reflections. A dual-action polisher makes the job that much easier, and the action of the head means that it’s very safe to use, making it almost impossible to damage the paint.
If you’re serious about the job, you can use a paint-depth gauge to make sure your paint isn’t too thin.
The general rule of thumb is to always start with the least aggressive compound on the softest pad, which will give you an idea of whether you need to go to a more aggressive combination if you’re not getting good results initially. You’ll be working your way across your car’s bodywork, section by section. You never want to try to correct too large a portion at once; it’s always better to work in smaller, more manageable sections and always take your time.
If your paint is bad, it might need multiple passes to remove the worst of the swirls. Once you’re done with correcting the paint, polishing will help to refine the finish, leaving you with stunning paintwork.
Check out our guide to paint correction for more advice. Looking for the best products? Check out our guide to the best car polishes in 2023.
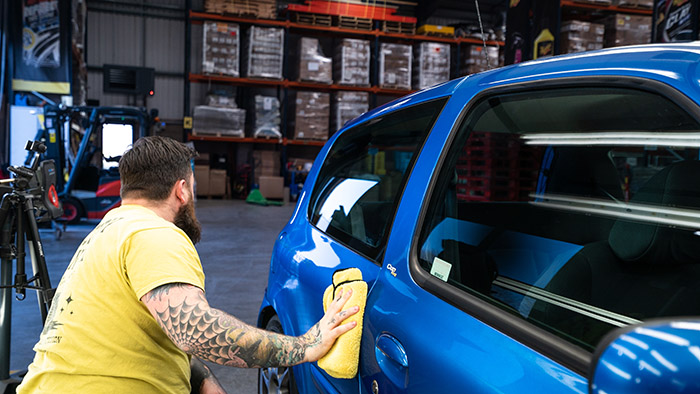
Waxing a Car
How long: 20 mins+.
Products: Paste/liquid/spray wax.
Detailing gear: Applicator, microfiber cloths.
Waxing your car will enhance the gloss and shine of your paintwork, as well as helping to protect it and keep it cleaner for longer. Paste wax is the more traditional choice, but it requires a bit more work as you have to spread it over the whole car by hand, let it cure and then buff it off, so it’s a bit of a workout. Burning a few extra calories while you’re detailing your car isn’t such a bad thing now, is it?
Liquid waxes are much quicker to apply, and you will often find the same version of paste waxes in liquid form. While you still have to apply the wax by hand, applying a liquid is obviously much quicker and easier than a paste. Finally, spray waxes are ideal for those who want the gloss and shine, but without taking all that time and effort, and these days you don’t have to compromise as the latest spray waxes offer incredible durability and protection.
Remember to always wax out of direct sunlight, go section by section, and have a handful of microfiber cloths to hand to make removal and buffing easier.
Check out our step-by-step guide on how to wax a car so you can perfect the process. Looking for the best products? Check out our guide to the best car waxes in 2023.
Maintenance Car Detailing
How long: 30 mins+.
Products: Quick detailer.
Detailing gear: Microfiber cloths.
Attempting to detail your car’s paintwork between washes might sound like a terrible idea, but as long as your car isn’t too dirty and it’s done carefully, you can get your car’s paint looking lovely with just a little effort. The key is to be gentle and take your time, using liberal sprays of quick detailer to lubricate the bodywork, then gently wiping with the microfiber cloth to lift the dust and dirt away. It’s the perfect way to keep your car clean in between washes while also adding an extra layer of protection via the quick detailer.
Be sure to check out our guide on how to maintenance wash a car.
Interior cleaning
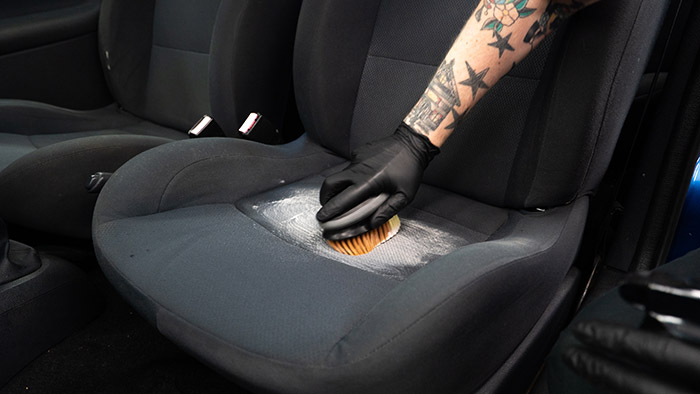
How long: 20mins+.
Products: Interior cleaner, carpet cleaner, leather cleaner.
Detailing gear: Detailing brushes, carpet and upholstery brush, microfiber cloths, vacuum cleaner.
The state of your interior will naturally dictate how long it will take to clean, but the good thing is that you can obviously do as much or as little as you need and as you have time to do. While vacuuming your carpets is a given, it’s also a good idea to vacuum in the creases of your seats to get all those little bits of dirt that are stuck in there. Cleaning your leather seats is one thing, but never underestimate just how dirty your leather steering wheel gets.
Some leather cleaner, a brush and a microfiber cloth will remove so much grime and leave your wheel looking and feeling much nicer. Don’t forget your door and dash trims, too, and some time with a detailing brush and interior cleaner will shift dirt you can’t even see and get your interior feeling so much fresher and nicer.
Check out our detailed guide on how to clean your car’s interior for more advice. Looking for the best products? Check out our guide to the best interior detailer in 2023.
Headlight Restoration
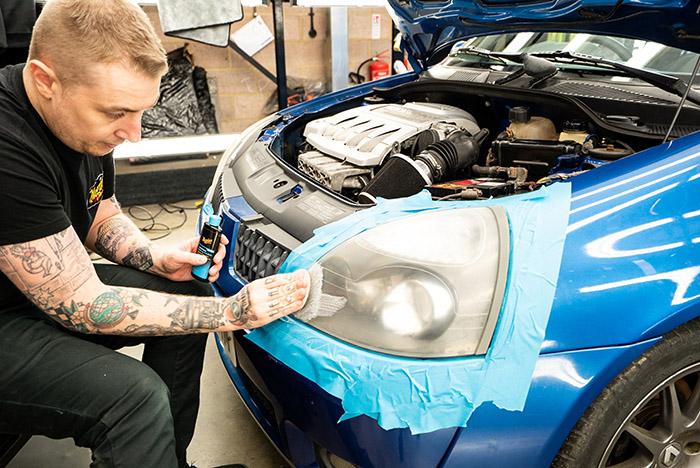
How long: 20 mins+.
Products: Headlight lens restoration kit.
Detailing gear: Drill.
Ugly, faded, cloudy yellow plastic headlight lenses not only look ugly, but they also reduce light output, so restoring them is well worth the effort. The easiest way to do this is using a kit that includes everything you need – some will come with a drill attachment that makes polishing off the yellow layer that much easier, while others are designed for hand application. The key is to apply a protective coating after polishing, as otherwise, UV damage will cause them to turn yellow again, so look for a kit that already includes that and never skip that step.
Check out our step-by-step guide on how to clean car headlights. Looking for the best products? Check out our guide to the best headlight restoration kit in 2023.
Car Glass Cleaning
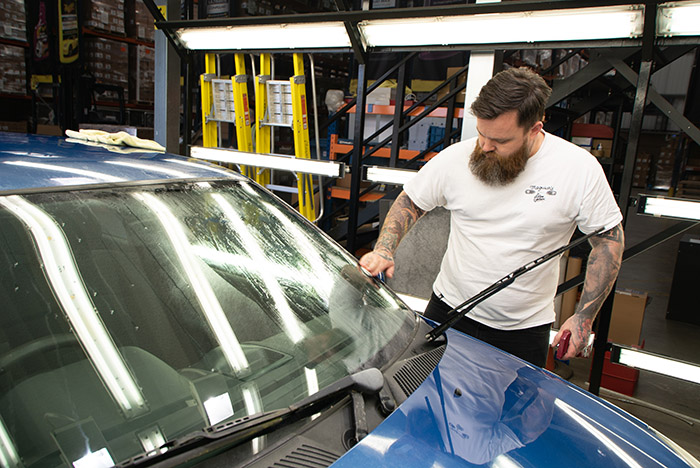
How long: 10 mins+.
Products: Glass cleaner.
Detailing gear: Microfiber cloths.
Washing your car will clean the glass, naturally, but it won’t be as clean as when you do it yourself properly and don’t forget about the inside of your glass, too. Depending on how dirty your glass is and how deep a clean you want to administer, you can go so far as claying your glass to remove contaminants that are really bonded onto the surface. You can also use glass polish, which will also help to deliver a deeper clean than just glass cleaner on its own. And, once you’re done with the glass on the outside, make sure you take the time to clean the inside as well, as it gets dirty too and will impair your vision.
For more advice, check out our step-by-step guide on how to clean car windows. Looking for the best products? Check out our guide to the best car glass cleaner in 2023.
Car Trim Restorer
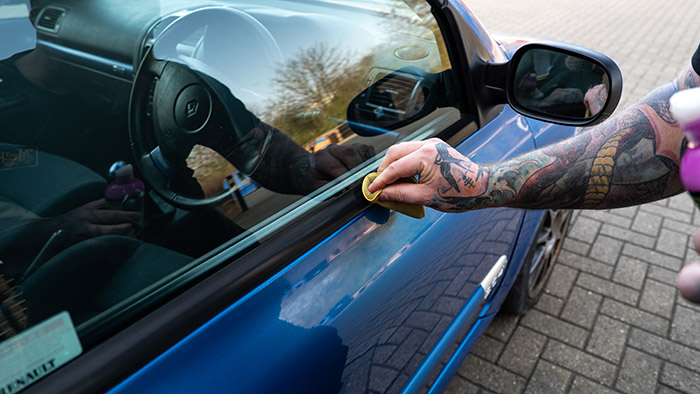
How long: 15 mins+.
Products: Trim restorer.
Detailing gear: Applicator pad.
Faded black plastic trim looks awful, turning grey or white over time, and it can really ruin the appearance of your car. Luckily, restoring it to its former glory is quick and easy, and all you need is some trim restorer and an applicator, and you are good to go. Which is why we’ve mentioned here in our what is car detailing guide. It won’t be permanent, but it’s so easy to do that it’s no big deal to re-do it whenever your trim starts fading again.
Check out our guide on how to restore black trim on a car for more advice.
Metal Polish
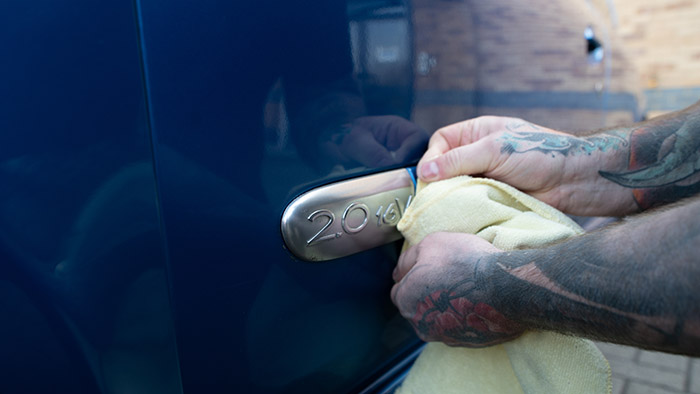
How long: 10 mins+.
Products: Metal polish.
Detailing gear: Microfiber cloths.
Getting the perfect finish on the metal elements on your car adds that final touch. All you need is your metal polish of choice and some microfiber cloths, plus a little elbow grease, and not only will you get those metal surfaces looking instantly better, but you’ll also help them to stay shinier and cleaner for longer.
Check out our guide on how to polish metal on a car for more advice.
The post How To Detail a Car appeared first on Fast Car.